

My blog for arts and crafts interests. On this site I will be including my favorite project ideas, craft obsessions, kawaii finds, art supply reviews, craft materials, supply stores/outlets, interviews of artists and crafts people, thrift shopping finds, my projects and completed works, and more! I'm a mobile blogger ^.^
Showing posts with label Tutorial. Show all posts
Showing posts with label Tutorial. Show all posts
Thursday, February 25, 2016
Live on Periscope Today at Noon MST
http://us6.campaign-archive1.com/?u=ac3d5ae9303c7a38ca8105ad1&id=f9f3b10fa5

Saturday, November 14, 2015
DIY: Mini Pennant Banner
Hello my pretties,
Today I want to share a fun little project with you - how to make a mini pennant banner using a Big Shot (or other die cutting machine), Spellbinders dies, and a sewing machine.


Today I want to share a fun little project with you - how to make a mini pennant banner using a Big Shot (or other die cutting machine), Spellbinders dies, and a sewing machine.


I am using pieces of scrap paper from this pack, which works perfectly because the small dies are really little. So cute! You simply line the dies up, face down.

Put the paper and dies between the two pieces of plastic, on top of the cutting platform, and run them through your Big Shot machine.

Once I cut several little pennant pieces I took them over to my sewing machine.
My tension was set to auto and my stitch length was set to 3 on my Singer Esteem sewing machine.

I pulled enough thread through so that I would have enough to use to tie my banner. I then pushed the first piece of paper up against the presser foot, and lined the paper up using the right edge of the presser foot as the guide.


Grab the left side of the paper to hold it straight and just use the hand crank to run it through the machine.
Do not use the pedal!

Do not use the pedal!

Once the paper has cleared the presser foot completely then press another piece of paper against the presser foot and repeat the process.


This is my finished product.
Perfect for using on a scrapbook page, to hang over a framed picture, to hang on a bookshelf, at the top of a mirror, etc. etc. The decorating possibilities are endless.

I've used mine to decorate my miniatures shelf.

Hope you found this helpful! I'll post a video as soon as I get another tripod.
Thanks for reading! <3
Myria
Wednesday, October 28, 2015
Dyeing Doilies with Alcohol Ink
Hello my lovelies,
I've been on this alcohol ink kick lately, as you've probably guessed based on my previous posts DIY Alcohol Ink and DIY Shimmer Spritz Experiment. Well, here's another!
I have been saving various vintage handkerchiefs and doilies that are stained, intending to do something cool with them. In most cases I can use OxyClean and super hot water to remove any stains, but there are a few that just won't come clean. Recently I decided to experiment with alcohol inks.

Unfortunately, I didn't take photos of my process so I'll just try to explain what I did.
Basically I just decided what pattern I wanted and which colors I wanted to go where.
I used the Wild Plum and Denim, combined with a hot pastel pink one that I made myself.
The Wild Plum is the darker purple color, the one I made myself is the lighter pink, and the blue parts are the denim ink.

I started by dabbing the plum ink just inside of the border, a little at a time, allowing it to bleed and spread.
Then I did the denim on the petals. Last I sprayed the hot pastel pink all over to help facilitate the ink to bleed and move and blend together. I used the inks again to fill in any gaps.

Next, I did the same thing with this one, dabbing the alcohol ink directly from the bottle onto the doily and allowing it to bleed and blend before I added more.
I allowed the doilies to dry completely before I soaked them in boiling water.

In my final step I boiled some water and poured it into a plastic bowl that I didn't care about.
I did the 1st one first and allowed it to soak, stirring occasionally, until the water had completely cooled. I then drained and rinsed it in cold water until the water was mostly clear.
Then, I repeated the process, adding this little round doily to the mix. I realized the 1st time around that I was wasting ink in the heat setting process, and that I could probably be dyeing some more fabric at the same time. I was right. This came out so cute!

I just love how these look! I'm definitely eager to make some more.
I'll be selling them in my booth at Antiques and Things, booth #19.
Hope you enjoyed this post!
Love,
Myria
Thursday, October 22, 2015
DIY Shimmer Spritz Experiment
Hello My Pretties!
I'm pretty excited to show you all how I made these Shimmer Ink Sprays.


I'm pretty excited to show you all how I made these Shimmer Ink Sprays.

I recently went to Tuesday Morning and bought a bottle of Tattered Angels Glimmer Mist. It was the only color they had, otherwise I would have bought more.

Only $2.49! I got it home, used it, loved it! Wanted more.

Then I got the bright idea to try to make my own. I've had these Johne Headlights sprays for YEARS. I bought them at the International Beauty Show in New York for something like $1 or $2 per bottle. I never used them because when you spray the glitter, as soon as the liquid dries the glitter falls off.
Lame.
I saved them because I just knew that I would be able to use them for something crafty one day.
(in this photo I had already emptied out 1/2 of the liquid from most of the bottles)

I read the ingredients and it seemed pretty straight forward. It is mostly made of botanicals, glitter, and alcohol.

I decided the best way to go about it would be to empty out 1/2 of the liquid

and add Mod Podge

I wasn't exactly sure how much to add so I started with a little bit, then spritzed it.
If the glitter didn't stick when it dried then I added more Mod Podge.

Here is the before photo of my sample tag.
Keep in mind that I have inked the edges of this tag with a ColorBox Paintbox ink pad to match the stamp.

Here is the after photo. Pretty!

I later got the idea to add some homemade Alcohol Inks to the mix.
These two turned out the best!
Up close photo of the Tattered Angels Glimmer Mist...pretty!

Photo of my pink glitter with pink alcohol ink added.

Photo of my blue glitter with pink and blue alcohol ink added.
(pink + blue = purple)

Verdict: it works!
To recap, I don't have an actual recipe but the ingredients used are alcohol, glitter, mod podge, and Alcohol Inks - in that order. If I had to, I'd say 60% Alcohol, 15% glitter, 15% mod podge, and 10% alcohol ink.
Keep in mind that $2.49 is not much to pay at all! And if you can find the Glimmer Mists that cheap then buy them! Don't bother making your own. However, in a pinch if you really need some for a late night project then you can easily make your own.
Hope you enjoyed my post,
Love,
Myria
Saturday, July 4, 2015
DIY Alcohol Ink
Hello Dearest Ones,
Today I'd like to share my experience with making my own Alcohol Inks. I've used the Ranger Alcohol Inks in the past and I really like them a lot! They're permanent and they dry really fast, so they're great for adding color to shiny plastics and metals.

Search my blog's materials category to see how I used them to change the color of some metal charms.
Anyhoo, I got the idea to make my own Alcohol Inks from Alisa Burke - an artist and blogger that I just adore! <3 She wrote a post titled "Kids Markers - Tips and Tricks for Adults". In the article she says that you can make watercolors and alcohol inks out of dried out Crayola Markers! OMG that's right up my alley - and to think I've been throwing them away when my daughter leaves the cap off. Doh!
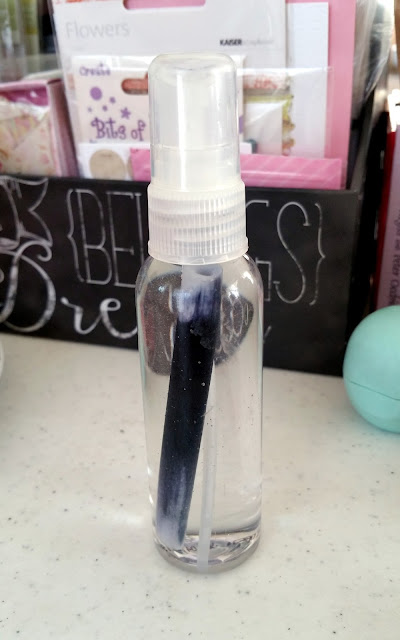
So, to make your own you will need a dried out marker, rubbing alcohol, and a container to put the ink in. Today I'm going to use an empty spray bottle, so I can spritz the ink out if I want.

For starters I peeled the label off my bottle.

Then I got some pliers to pull the end cap off of the marker.

I put the ink tube into my bottle.

And added the rubbing alcohol.

Nothing much happened right away so I got the idea to pull the marker tip off too!
After I added that in, the ink REALLY started to bleed out into the alcohol.

After a few moments it looked like this! Awesome! Keep in mind that Alisa says to leave them soaking overnight for the best results.

I was so pleased with the black ink that I decided to proceed with some hot pink.

I actually had to break the end cap off of the marker in order to get the ink tube out. I then used needle nose pliers to pluck out the remaining pieces of plastic and pull out the tube.

I put in the tube and marker tip and added in the rubbing alcohol. I only filled it about half way because the tube was shorter than the 1st one.
I had ink on my fingers from touching the black marker's tip and some of it bled onto the pink marker tip so, be sure to wash your hands in-between markers!

Here is what they looked like after a few minutes.
As I said, let soak overnight for the best results.

Hope you liked this post! Stay tuned because on Saturday, July 11th I'll be hosting a Mad Tea Party and Needle Felting Party. I will be sharing the photos of my event and I can't wait to see what you think!
Here is the event invite:
And here is a photo of our craft project:
Thank you for reading!
Love,
Myria
Friday, June 5, 2015
Favorite Photo Deco App
Hello cuties!
In one of my previous posts I raved about the Snapeee Photo Deco App. It's like Instagram except includes tons of stickers, text, frames, effects, etc. I still really like this app however I recently discovered one that I like EVEN BETTER!
It is called Cameran Collage and it is available on both the Android and Apple markets.

I like it because unlike the other photo deco apps that I've used, (Snapeee, Picute, Animal Face) it doesn't have ANY in-app purchase requirements to get the cool deco packs. I believe that this is because this app is sponsored/produced by Japan's major fashion magazines and brands ("nonno","MORE", "BLENDA","LEE", "L'OCCITANE","MERCURYDUO", "deicy", "Afternoon Tea LIVING", "Mark's masté", "X-girl", "Cocoonist") so it is just free advertising for them.

When you open the app you will see this page.
Tap on the Present icon on the bottom left to add deco packs

Once you're done adding sticker packs then scroll through the design themes and tap on the one that you want to use.
There are pre-designed templates...

...or you can start from scratch.

Another thing that I really like about this app is that you can add photos from the albums on your phone, or you can add from other apps like Dropbox, Facebook, or search google for images!

When you're done with your design you just tap the Next icon on the upper right conner of the screen. It will take you to this screen where you can save and share your photo to Facebook and Twitter with a comment, or you can share to Instagram, email, LINE, or other apps on your phone.

Here are some photos that I've decorated


I can't wait to print these out and put them in frames!
I'm also very excited about printing some of these on my Polaroid ZIP so I can put photos in my planner.
Thanks for reading!
Love,
Myria
Subscribe to:
Posts (Atom)