Pages

Showing posts with label recycling. Show all posts

Wednesday, October 28, 2015

Dyeing Doilies with Alcohol Ink

Hello my lovelies,

I've been on this alcohol ink kick lately, as you've probably guessed based on my previous posts DIY Alcohol Ink and DIY Shimmer Spritz Experiment.  Well, here's another!

I have been saving various vintage handkerchiefs and doilies that are stained, intending to do something cool with them.  In most cases I can use OxyClean and super hot water to remove any stains, but there are a few that just won't come clean.  Recently I decided to experiment with alcohol inks.

Unfortunately, I didn't take photos of my process so I'll just try to explain what I did.
Basically I just decided what pattern I wanted and which colors I wanted to go where.

I used the Wild Plum and Denim, combined with a hot pastel pink one that I made myself.
The Wild Plum is the darker purple color, the one I made myself is the lighter pink, and the blue parts are the denim ink.

 I started by dabbing the plum ink just inside of the border, a little at a time, allowing it to bleed and spread.
Then I did the denim on the petals.  Last I sprayed the hot pastel pink all over to help facilitate the ink to bleed and move and blend together.  I used the inks again to fill in any gaps.

Next, I did the same thing with this one, dabbing the alcohol ink directly from the bottle onto the doily and allowing it to bleed and blend before I added more.
I allowed the doilies to dry completely before I soaked them in boiling water.

In my final step I boiled some water and poured it into a plastic bowl that I didn't care about.
I did the 1st one first and allowed it to soak, stirring occasionally, until the water had completely cooled.  I then drained and rinsed it in cold water until the water was mostly clear.

Then, I repeated the process, adding this little round doily to the mix.  I realized the 1st time around that I was wasting ink in the heat setting process, and that I could probably be dyeing some more fabric at the same time.  I was right.  This came out so cute!

I just love how these look!  I'm definitely eager to make some more.
I'll be selling them in my booth at Antiques and Things, booth #19.

Hope you enjoyed this post!
Love,
Myria


Saturday, July 11, 2015

Mad Tea Party with A Fanciful Twist AND Needle Felting Class

Hello My Lovelies,

I have been eagerly waiting for this day to arrive and it's finally here!  My Mad Tea Party and Needle Felting Class.  The tea party is hosted by Vanessa Valencia at A Fanciful Twist.  Be sure to visit her blog, as well as the blogs of the other tea party hosts.


I'm waiting awhile to prep completely for my tea party.  I want the tea to be hot and the macaroons to be fresh!  But don't worry - tomorrow I will post all of the photos of the tea party and needle felting class.

Meanwhile, I thought I would share my collection of tea/coffee/hot chocolate ware with you.
In my kitchen, above my cabinets, I have a nice space to display my sets.

I'm pretty much obsessed with Alice in Wonderland

Yup

Here is my Bavarian Hot Cocoa set that I inherited from my grandmother. 

I picked up this coffee pot, tea pot, and creamer at various thrift shops 

Here is another set that I inherited from my Grandmother.  A biscuit jar, cup and saucer, creamer cup, and coffee pot.  It's not all one set but they compliment each other nicely.  
Perfect for spoiling yourself on a chilly morning.  

It's chipped - like most things that are well loved - all the more reason to use it!

Love! 

My mom bought this set for my birthday this year.  We got it at an Antique Shop that is in an old school house in Arkansas.  I fell in love with it when I saw it.  It is hand painted and signed.  The woman who did this did an excellent job!  

My 2 of my handmade tiered party plates, and 1 vintage one.  I'll be using the one on the left for my tea party so you'll see better photos of that one.

I picked these Bailey's Irish Coffee cups, sugar, and creamer up at Things Etc., an indoor flea market in Albuquerque.  Got a screaming deal on these.  I have 4 cups total plus the sugar and creamer.  I was so excited that I was able to complete the set during one shopping trip!  A couple of different vendors had all of the pieces that made up my set.  
It was meant to be!

So cute! 

Here is my party setup.

Upcycled tiered party plate - made by me! 

I'll be serving the flowering green tea in a clear teapot.  I have a nice tea cozy that I swapped for at a craft show.  It works great!  I highly recommend getting a tea cozy. 

My creamer cup that I a fellow vendor at Antiques and Things gave me - not the same pattern as the tea set that I'm using but VERY close. 

My cups and saucers.  These also used to belong to my grandma.  
The pattern is Haviland Apple Blossom

My craft studio - it has enough seating for 9 people. 

The needle felting class kits. 

I'll be showing my students the various needle felting tools and how to use them.  
Plus show them how to craft on a budget.

Each student will get to choose a cup and saucer with which to make their pin cushion for the class.
(The swan one is mine)

And this is what we'll be making.  Needle felted latte pin cushion.
A photo posted by Myria (@mandellphotos) on

Thank you for reading!  Stay tuned for tomorrow's post.  I'll be sharing photos of the party and the final products of the craft class.

Love,
Myria

Saturday, July 4, 2015

DIY Alcohol Ink

Hello Dearest Ones,

Today I'd like to share my experience with making my own Alcohol Inks. I've used the Ranger Alcohol Inks in the past and I really like them a lot! They're permanent and they dry really fast, so they're great for adding color to shiny plastics and metals.

Search my blog's materials category to see how I used them to change the color of some metal charms.

Anyhoo, I got the idea to make my own Alcohol Inks from Alisa Burke - an artist and blogger that I just adore! <3  She wrote a post titled "Kids Markers - Tips and Tricks for Adults".  In the article she says that you can make watercolors and alcohol inks out of dried out Crayola Markers!  OMG that's right up my alley - and to think I've been throwing them away when my daughter leaves the cap off.  Doh!


So, to make your own you will need a dried out marker, rubbing alcohol, and a container to put the ink in.  Today I'm going to use an empty spray bottle, so I can spritz the ink out if I want.

For starters I peeled the label off my bottle.

Then I got some pliers to pull the end cap off of the marker. 

I put the ink tube into my bottle. 

And added the rubbing alcohol. 

Nothing much happened right away so I got the idea to pull the marker tip off too!  
After I added that in, the ink REALLY started to bleed out into the alcohol. 

After a few moments it looked like this!  Awesome!  Keep in mind that Alisa says to leave them soaking overnight for the best results. 

I was so pleased with the black ink that I decided to proceed with some hot pink. 

I actually had to break the end cap off of the marker in order to get the ink tube out.  I then used needle nose pliers to pluck out the remaining pieces of plastic and pull out the tube. 

I put in the tube and marker tip and added in the rubbing alcohol.  I only filled it about half way because the tube was shorter than the 1st one.
I had ink on my fingers from touching the black marker's tip and some of it bled onto the pink marker tip so, be sure to wash your hands in-between markers!

Here is what they looked like after a few minutes.  
As I said, let soak overnight for the best results. 

Hope you liked this post!  Stay tuned because on Saturday, July 11th I'll be hosting a Mad Tea Party and Needle Felting Party.  I will be sharing the photos of my event and I can't wait to see what you think!

Here is the event invite:

And here is a photo of our craft project:

A photo posted by Myria (@mandellphotos) on


Thank you for reading!
Love,
Myria


Friday, April 10, 2015

Vintage Korean Doll Re-Work, Art, and My Mom's Craft Room

Hello Cutie-pants,

During my visit to my mom in Arkansas, my mom and I tasked ourselves with finding goods for my booth at Antiques and Things.  We found many many many good things to keep and to sell.  I'll be sharing them on my Instagram page so be sure to follow that.

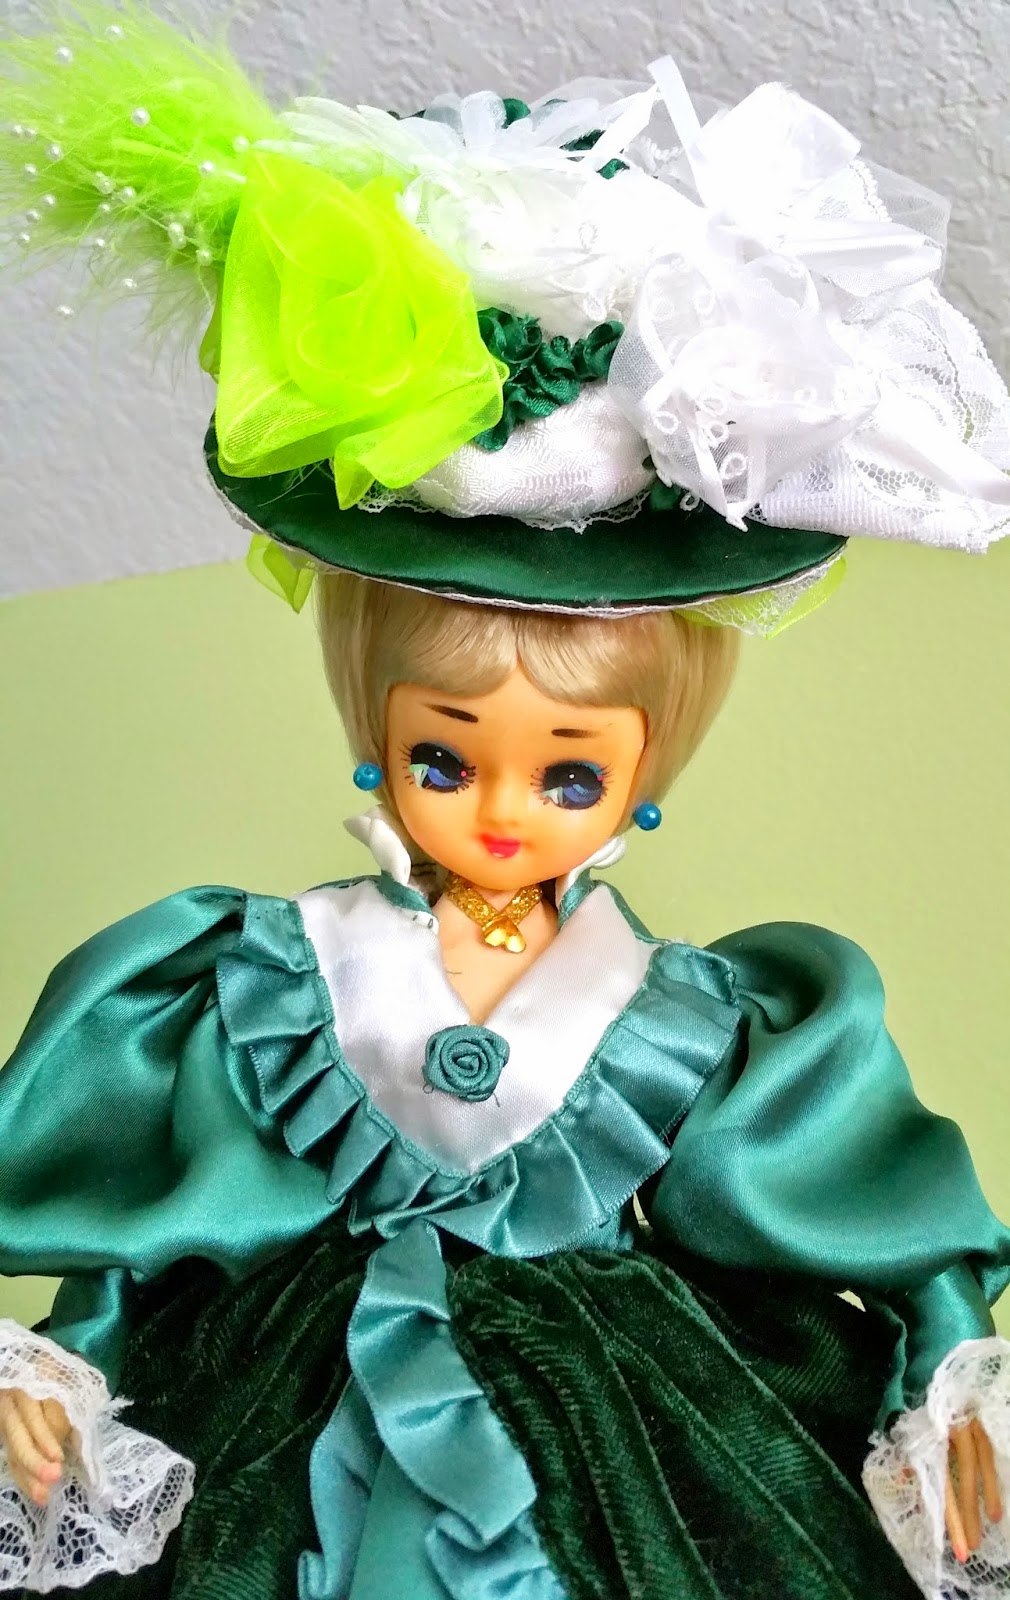
One of the things that we found was this vintage Korean doll, called a Bradley Doll.  I was super excited to buy it for $5.


My aunt had some of these in her doll collection so I've always liked them.  What I like in particular is their starry eyes!  Sooooo cool.


As a result I am particularly fond of art with starry eyed females in it.  I've added a bunch to my Pinterest board Fabulous Art so swing on over there to check some out.  Here is one example by Kat Kalindi Cameron

Getting back to the doll...she was so cheap because she was a mess!  I tried to clean her up but there were deep stains and sun damage.  My mom and I decided to just make her a new dress.

Here is another Bradley Doll that we picked, up whose eyes needed to be re-done.  
This photo was taken after my mom and I drew in her eyes and took apart the first doll's dress and hat.
I still need to go in with some white paint to add the stars to the doll on the right.  We also messed up and got some ink on her forehead, to the left of her eyebrow, so I'm going to try to get it out.  We may have ruined this doll...whoops!  Oh well - crafting isn't always perfect.

I surprised my mom in her little sewing room while she was sewing the new dress.

 Posing for the camera - my mom is 67!  She looks so good for her age.

While I'm in here I might as well show one of the cute little pieces of furniture that she found second hand.  It is a bit shabby but it is definitely chic!

 Inside is storage for thread and other notions.  Cute!

 Working away...

 Patiently waiting...

 We were going to sew her an entirely new dress but my mom remembered that she had one for a 16" doll, so she just altered it to fit our Bradley Doll.

 Unfortunately, she accidentally sewed it crooked.  As a result, she had to un-sew and then re-sew by hand.  
Here she is holding it center so she can begin stitching.

 Meanwhile I added a tulle petticoat

When the dress was done she looked great!  I like it because she looks more proper - less like an 1800s bar-maid.  I made the hat.

 I added lime green feathers, ribbon, and rose to it for drama.

What do you think?  Love it?  Hate it?
Actually, don't tell me if you hate it.  "If you can't say anything nice..."

 What's important is I like it.

The glue gun is my friend <3

Thanks for reading!
Love,
Myria