Pages

Showing posts with label party invitation. Show all posts

Wednesday, February 17, 2016

This Was Inevitable - I've Become a Stampin Up Demonstrator

Hello my awesome readers,

Welp, this was inevitable...I have decided to join Stampin Up.  It all started when my SU demonstrator Anne sent out her monthly email in January, letting us know that it was Sale-a-Bration.  During the annual Stampin Up Sale-a-Bration event when you become a Demonstrator you get $205 in craft supplies and business tools for only $99.  As a customer (and big fan!) of SU that was pretty hard to resist, so I figured I'd give it a shot.


One of the reasons that I love Stampin Up is that they offer a wide variety of Project Life/Planner supplies at great prices!   Check out the clearance section where you can get PL kits for less than $7!
# 135299 Little Moments Project Life Card Collection $6.38 


Now that I'm a demonstrator I will be adding Stampin Up workshops to my class repertoire.  I am so excited to be teaching you all how to create easy and beautiful cards, as well as memory planners, and Project Life layouts.

Selling a house, buying a house, packing, and moving all during December and January forced me to take a break from teaching craft classes, but I'm all settled in now so I will be scheduling classes starting in late February.

Visit my Stampin Up site, join my mailing list, follow my SU blog, and look at these GORGEOUS ideas!

I look forward to seeing you at one of my upcoming classes but I would be TICKLED if you hosted your own workshop!  So tickled in fact that I will gift you a set of washi tape when you host an in-home workshop.

If you just want to attend a class then stay tuned for workshop invites, or you can go online now and place an order using code 93AQWA7E now through February 29th, 2016.  Receive a FREE item for every $50 that you spend (before taxes and shipping).  Yes, that means if you spend $100 then you get 2 free items!

Thank you for reading and I look forward to teaching you easy techniques to make beautiful things.
Love,
Myria

Thursday, November 12, 2015

Business Collab with L'Amour Baking Company

Hello my sweets!

I'm super excited to announce that I've teamed up to do a business collaboration with L'Amour Baking Company, an adorable bakery here in Los Ranchos that specializes in French Macaroons.
And let me say - they are delicious!!!! <3 <3 <3

They are definitely my favorite bakery in town, although I may be a bit biased because I can walk to it from my house...


I have made them some polymer clay macaroon and cupcake jewelry to sell in their bakery.
Now customers can buy souvenir earrings, charms, and rings to remember their delicious pastries by.

Here is a pair of earrings that replicate their Red Velvet macaroons.

These clay pieces come complete with stainless steel ear hooks, clasps, and L'Amour heart charms.  
These ones are kiwi lime macaroons.

These charms come with lobster clasps so that you can hook them onto your bracelet, necklaces, zippers, keys, and more! 
These are Salted Caramel and Orange Dream macaroons.

The rings are adjustable and nickel free! 

Orange Dream cupcake earrings 

Now let me show you their baked goods <3

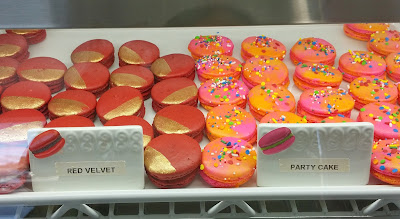
Gorgeous Red Velvet and Party Cake macaroons

Vanilla Bean and Just Chocolate macaroons 

My favorites!  Lavender and Pistachio macaroons 

My second favorites!  Salted Caramel and Lemonade macaroons

Chocolate Mint and Pecan Pie macaroons.  
Both are flavors of the month

Cappuccino and Pumpkin Pie macaroons 

Adorable and festive Autumn cupcakes 

In addition to delicious macaroons and cupcakes you can also order pumpkin pies, pecan pies, pumpkin rolls, and dinner rolls for your holiday parties.

Here's a photo of their Pumpkin Rolls.  Nom nom nom! 

Or how about a Salted Caramel Apple Tart? 

I didn't take a photo but they also offer DELICIOUS Quiches.

Now that I've tempted you with jewelry and pastries, I hope you'll make it out to their Thanks For Giving event.  They are collecting a variety of needed goods from November 10th-25th to help our community during the holiday.   Click HERE for a list of items to donate.  

With your donation you will receive 15% off your treats from L'Amour Baking Co!

All donations will benefit Albuquerque Heading Home and Joy Junction

Treat yo-self!
Love,
Myria

Saturday, July 11, 2015

Mad Tea Party with A Fanciful Twist AND Needle Felting Class

Hello My Lovelies,

I have been eagerly waiting for this day to arrive and it's finally here!  My Mad Tea Party and Needle Felting Class.  The tea party is hosted by Vanessa Valencia at A Fanciful Twist.  Be sure to visit her blog, as well as the blogs of the other tea party hosts.


I'm waiting awhile to prep completely for my tea party.  I want the tea to be hot and the macaroons to be fresh!  But don't worry - tomorrow I will post all of the photos of the tea party and needle felting class.

Meanwhile, I thought I would share my collection of tea/coffee/hot chocolate ware with you.
In my kitchen, above my cabinets, I have a nice space to display my sets.

I'm pretty much obsessed with Alice in Wonderland

Yup

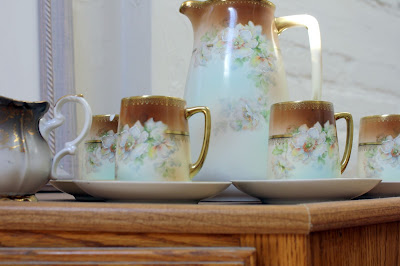
Here is my Bavarian Hot Cocoa set that I inherited from my grandmother. 

I picked up this coffee pot, tea pot, and creamer at various thrift shops 

Here is another set that I inherited from my Grandmother.  A biscuit jar, cup and saucer, creamer cup, and coffee pot.  It's not all one set but they compliment each other nicely.  
Perfect for spoiling yourself on a chilly morning.  

It's chipped - like most things that are well loved - all the more reason to use it!

Love! 

My mom bought this set for my birthday this year.  We got it at an Antique Shop that is in an old school house in Arkansas.  I fell in love with it when I saw it.  It is hand painted and signed.  The woman who did this did an excellent job!  

My 2 of my handmade tiered party plates, and 1 vintage one.  I'll be using the one on the left for my tea party so you'll see better photos of that one.

I picked these Bailey's Irish Coffee cups, sugar, and creamer up at Things Etc., an indoor flea market in Albuquerque.  Got a screaming deal on these.  I have 4 cups total plus the sugar and creamer.  I was so excited that I was able to complete the set during one shopping trip!  A couple of different vendors had all of the pieces that made up my set.  
It was meant to be!

So cute! 

Here is my party setup.

Upcycled tiered party plate - made by me! 

I'll be serving the flowering green tea in a clear teapot.  I have a nice tea cozy that I swapped for at a craft show.  It works great!  I highly recommend getting a tea cozy. 

My creamer cup that I a fellow vendor at Antiques and Things gave me - not the same pattern as the tea set that I'm using but VERY close. 

My cups and saucers.  These also used to belong to my grandma.  
The pattern is Haviland Apple Blossom

My craft studio - it has enough seating for 9 people. 

The needle felting class kits. 

I'll be showing my students the various needle felting tools and how to use them.  
Plus show them how to craft on a budget.

Each student will get to choose a cup and saucer with which to make their pin cushion for the class.
(The swan one is mine)

And this is what we'll be making.  Needle felted latte pin cushion.
A photo posted by Myria (@mandellphotos) on

Thank you for reading!  Stay tuned for tomorrow's post.  I'll be sharing photos of the party and the final products of the craft class.

Love,
Myria

Saturday, July 4, 2015

DIY Alcohol Ink

Hello Dearest Ones,

Today I'd like to share my experience with making my own Alcohol Inks. I've used the Ranger Alcohol Inks in the past and I really like them a lot! They're permanent and they dry really fast, so they're great for adding color to shiny plastics and metals.

Search my blog's materials category to see how I used them to change the color of some metal charms.

Anyhoo, I got the idea to make my own Alcohol Inks from Alisa Burke - an artist and blogger that I just adore! <3  She wrote a post titled "Kids Markers - Tips and Tricks for Adults".  In the article she says that you can make watercolors and alcohol inks out of dried out Crayola Markers!  OMG that's right up my alley - and to think I've been throwing them away when my daughter leaves the cap off.  Doh!


So, to make your own you will need a dried out marker, rubbing alcohol, and a container to put the ink in.  Today I'm going to use an empty spray bottle, so I can spritz the ink out if I want.

For starters I peeled the label off my bottle.

Then I got some pliers to pull the end cap off of the marker. 

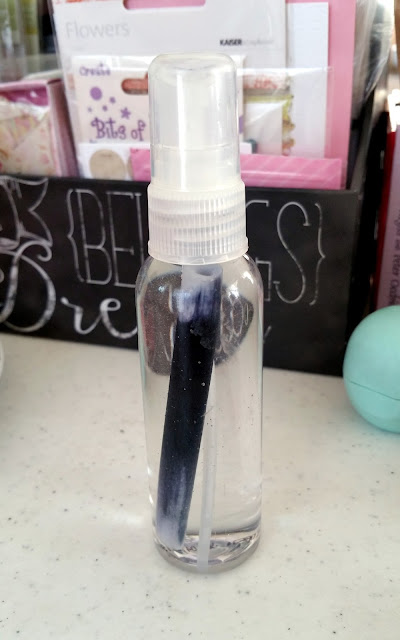
I put the ink tube into my bottle. 

And added the rubbing alcohol. 

Nothing much happened right away so I got the idea to pull the marker tip off too!  
After I added that in, the ink REALLY started to bleed out into the alcohol. 

After a few moments it looked like this!  Awesome!  Keep in mind that Alisa says to leave them soaking overnight for the best results. 

I was so pleased with the black ink that I decided to proceed with some hot pink. 

I actually had to break the end cap off of the marker in order to get the ink tube out.  I then used needle nose pliers to pluck out the remaining pieces of plastic and pull out the tube. 

I put in the tube and marker tip and added in the rubbing alcohol.  I only filled it about half way because the tube was shorter than the 1st one.
I had ink on my fingers from touching the black marker's tip and some of it bled onto the pink marker tip so, be sure to wash your hands in-between markers!

Here is what they looked like after a few minutes.  
As I said, let soak overnight for the best results. 

Hope you liked this post!  Stay tuned because on Saturday, July 11th I'll be hosting a Mad Tea Party and Needle Felting Party.  I will be sharing the photos of my event and I can't wait to see what you think!

Here is the event invite:

And here is a photo of our craft project:

A photo posted by Myria (@mandellphotos) on


Thank you for reading!
Love,
Myria