Pages

Wednesday, March 18, 2015

My First Day with Polymer Clay

Hey hottie boom-botties,

I have been dying to get into polymer clay!  I want to start making my own kawaii charms out of clay, as well as incorporate it into my gem stone and vintage assemblage pieces.

I purchased a pack of 24 clay colors by Premo, and a craft mat, with my tax return.  (Thanks Amazon and TurboTax!)  I have also purchased some kawaii molds, and other tools, that I am currently waiting to arrive.

I didn't want to start making anything until all of my tools and materials arrived but today I found a need to use polymer clay.

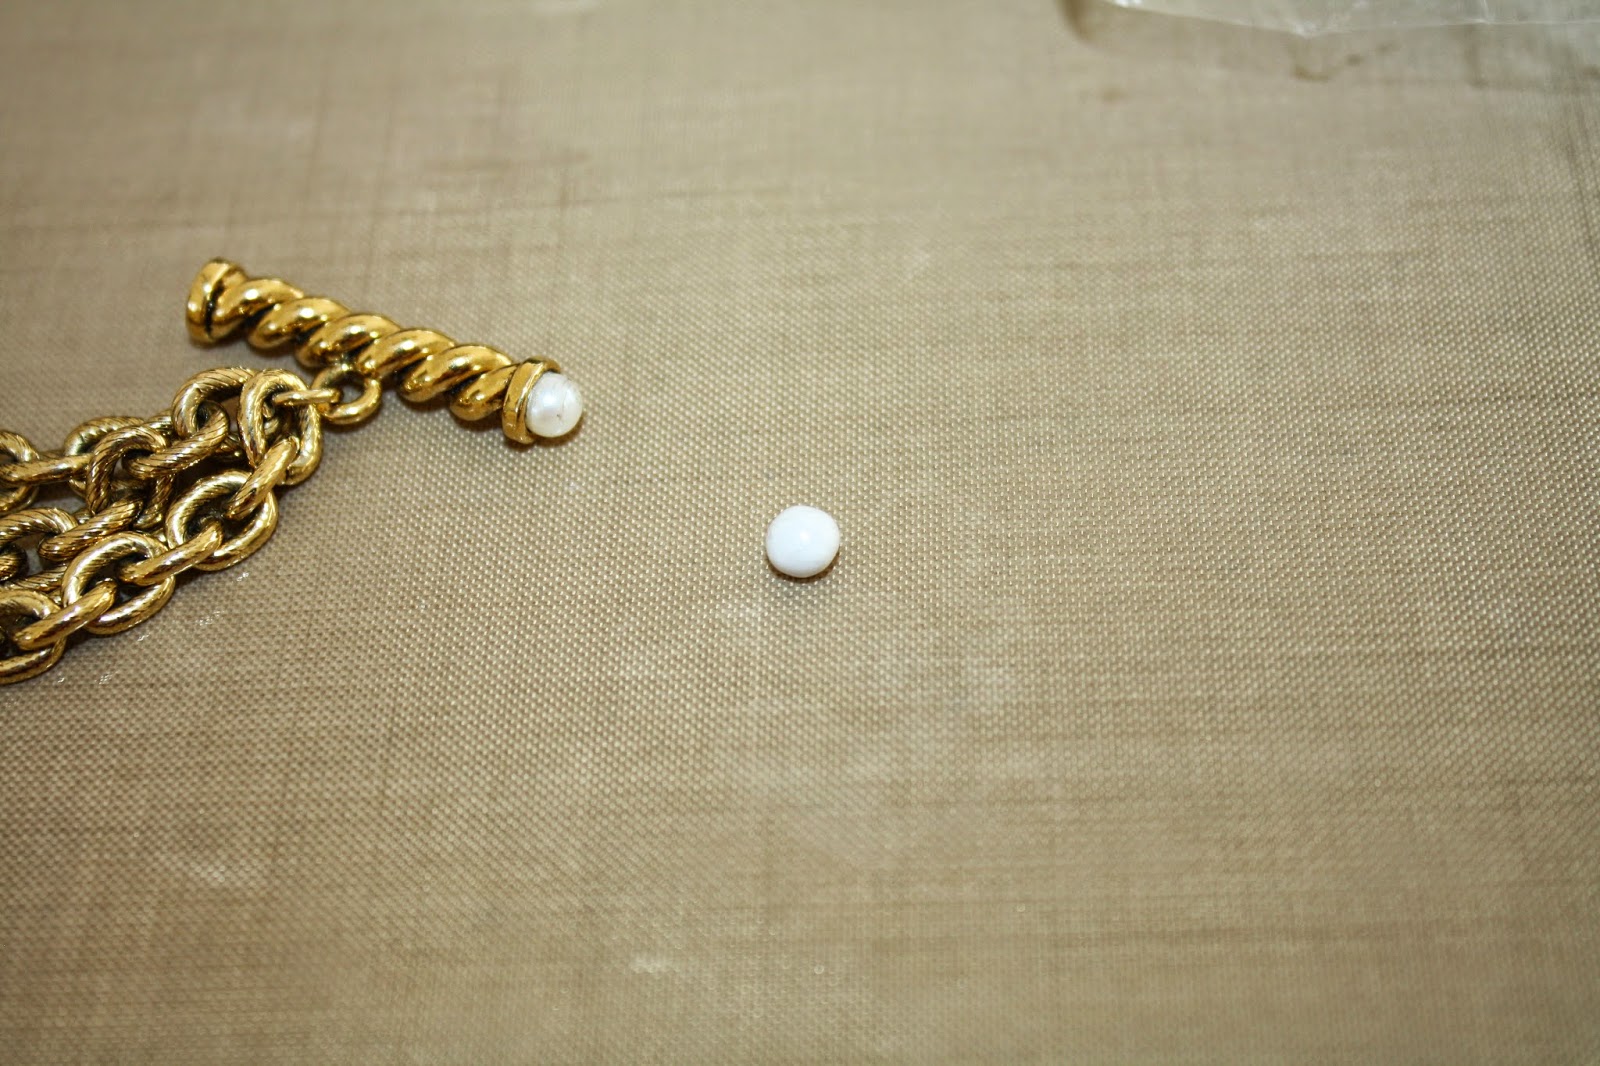
I have this adorable vintage necklace that is missing a pearl in the toggle clasp.  I tried to find a vintage glass pearl in my bead collection to replace it, but sadly I couldn't find anything small enough.

So I decided to use clay.  I selected the white and pearlescent gray clays.

I took 2 tiny pieces 

and smooshed them together over and over again to blend the two together.

I made it a round as I could, being careful not to get any lint on the clay.

Once I was satisfied with the shape I got out my set of two 8" x 8" cake pans that I purchased at the Dollar Tree.

I put my ball inside and clamped it closed.  
This was probably overkill but hey - this is my first time!
I put it in the oven at 275 degrees for 30 minutes.

Meanwhile, I'm realizing that I need to make my pearl ball glossy somehow.  I'm in my pajamas so there is no way I'm leaving the house, but I am determined to get this project finished TODAY!
I stumble upon the Polymer Clay Cyclopedia and found that there are several household items that I can use - excluding nail polish.

I decided on Mod Podge Gloss-Lustre

When my ball was done baking I got a pinch of E6000 and used it to glue the ball into the clasp.

Of course I see that my ball is larger than the glass pearl.  Crap.
I am now thinking that I need to pop out the pearl and replace it with another clay ball.
(It does have a little scratch on it so that justifies it right?)

I decided on making another ball instead.  So I popped out the clay ball and started over.  This time I used beige and pearlescent gray clay.  

The first one is on the right and the second one is on the left.

I baked it and glued it in.  They are almost exactly the same size!  Yay me.

Next, get a Q-Tip and dip it in Mod Podge - just a little!  Use the Q-Tip to paint the Mod Podge onto your piece of clay.  (Note:  This is the 1st ball that was too big but you get the idea)

And now it is done!

Much better!  The clay piece is on the left.


I think I'm going to have fun with polymer clay!
Love,
Myria

Monday, March 16, 2015

DIY Vintage Handkerchief Pennant Banner - No Sew

Hello my cutesie-tootsies,

I just did a fun and easy decor project in my craft studio that I thought I would share with you.
Over the years I have amassed quite the collection of vintage handkerchiefs.  I had ironed, neatly folded, and stored them in a lingerie drawer for a couple of years.  I recently decided, now that I have this space, to display them.

This is the way that I did it. 

I tied some ribbon to my ceiling fan and tied the other ends to my curtain holders - also ribbons.  

 My mom had purchased several rolls of ribbon second hand for really cheap so I've been using them for ALL SORTS of things.

I used a tailor's tape measure to see how much ribbon I needed.  I tied one end of the tape measure to the ceiling fan and pulled it across the room to the top of the curtains.  I added a few inches so I could have extra for tying.  Cut and hang.  Simple.

 I used mini-clothespins that I purchased at Tuesday Morning and just folded the hankies diagonally.  Boom!  Done.

They are so beautiful - I love vintage craftsmanship! 


I also added some paper pennant banners to my loft lookout, as well as more hankies.  

Comment if you would like for me to post a video on how to make the paper ones too!  
They are super easy.

My ribbon rolls

I also displayed some of my hand-stamped handkerchiefs. 

This is a fun and easy, no sew, way to spruce up some plain hankies.


You have to be really careful and comfortable with stamping before doing this though.

Because it is easy to ruin the handkerchief with a badly stamped image.

Take this one for example - I accidentally stamped one of these Alice in Wonderland images on the wrong side of the handkerchief.  Whoops!  Luckily the fabric is very thin and my image is very dark so it isn't too obvious.

To stamp handkerchiefs you will need some of this Ranger Archival Ink.  It is acid free, permanent, and waterproof.  It is permanent like a sharpie so there is no going back one you've started!

But it is worth it.


Love,
Myria

Thursday, March 12, 2015

Mysterious Japanese Candy from Kawaii Box

Hello Kawaii Buddies,

I am a lover of all things kawaii and so I subscribe to Kawaii Box.  It is fun for me...it is fun for my daughter, although I have to make sacrifices and let her have things that I really want to keep for myself...but hey - that's what parenting is all about.

Anyway, in this month's package we received a package of some sort of mysterious Japanese candy.  At first glance, during my daughters frenzied attempt to claim the candy as her own, I thought it was going to be some Japanese version of Peeps marshmallow candy but no I was wrong.  So wrong.

So I open it only to discover that the package contains a tray, a spoon, and 3 packets of some mystery ingredients.

So, I flip the package over only to discover that the instructions are in Japanese.

Thank goodness for photo instructions!

Step 1:  Pour packet 1 into left section of tray and add water using the tiny detachable measuring cup
 

Step 2:  Add contents of packet 2 to the tray and mix using spoon
(she was so excited to help make it)

Step 3:  Add contents of packet 3 to 2nd section of the tray

Time to eat!  Would you eat it?  We did.  The whipped stuff tasted like a combination of fizz-less sour grape pop rocks and nerds, and the crushed up candy tasted like grapefruit.  It was pretty intense.  
I couldn't read the ingredients so I only let her have a few small spoonfuls and I ate the rest.

I love Japan.

Sincerely,
Myria <3

Wednesday, March 11, 2015

Purse of the Week...or month. Whatever.

Hello Readers,

I haven't been keeping up on my purse rotation and I want to apologize for that.  I'm SORRY!  Geez.
Anyway, the last time I changed out my purse was in November, when I switched to a Katharina Leuzinger LeSportsac.  I have since switched purses 2 times.

The first one was this cute cross body LeSportsac with a cute little kitty in her dressing room.  This bag came with a makeup bag, which is awesome.  I'm still using my Lily Bloom cupcake wallet.

I love the versatility!  The strap is designed so that you can switch between a shoulder bag and cross body.  Two compartments on the front for keys and cell phone.  There are several more inside and one on the back.

I can't even stand how cute this print is!

Once I got tired of that one I switched to this BFREE Artist In Residence LeSportsac and a vintage woodland creature LeSportsac makeup bag.  I bought both of these on Ebay.

Cute!  Squirrels, rabbits, foxes, owls, birds = love <3

They've done it again.  This bag goes from cross body to shoulder bag to handbag.  I love the cool kitschy faces and bright colors.

"The world is ours"

Love,
Myria