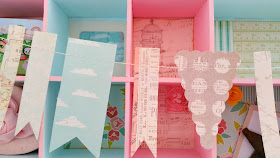
Today I want to share a fun little project with you - how to make a mini pennant banner using a Big Shot (or other die cutting machine), Spellbinders dies, and a sewing machine.
I am using pieces of scrap paper from this pack, which works perfectly because the small dies are really little. So cute! You simply line the dies up, face down.
Put the paper and dies between the two pieces of plastic, on top of the cutting platform, and run them through your Big Shot machine.
Once I cut several little pennant pieces I took them over to my sewing machine.
My tension was set to auto and my stitch length was set to 3 on my Singer Esteem sewing machine.
I pulled enough thread through so that I would have enough to use to tie my banner. I then pushed the first piece of paper up against the presser foot, and lined the paper up using the right edge of the presser foot as the guide.


Grab the left side of the paper to hold it straight and just use the hand crank to run it through the machine.
Do not use the pedal!

Do not use the pedal!

Once the paper has cleared the presser foot completely then press another piece of paper against the presser foot and repeat the process.


This is my finished product.
Perfect for using on a scrapbook page, to hang over a framed picture, to hang on a bookshelf, at the top of a mirror, etc. etc. The decorating possibilities are endless.
I've used mine to decorate my miniatures shelf.
Hope you found this helpful! I'll post a video as soon as I get another tripod.
Thanks for reading! <3
Myria


No comments:
Post a Comment